Showing posts with label HQ Sweet Sixteen. Show all posts

Thursday, April 25, 2019

Make a Run for it

My latest custom quilt came to me in the best way-- as a referral from a friend of the Kimono Quilt customer.  Even in the digital age, word-of-mouth advertising still works!

This was a straightforward Tshirt quilt made from a shirt collection accumulated over many years of participation in road races.  What we ended up doing was selecting the favorite shirts for this lap size quilt, with many left over for a possible future project.


Just for fun, I did an off-set setting of the rows, which I haven't tried before but I really like it!


This pic shows the background fabric:  Contempo Abstract Garden from Benartex (more information about it here).  It's a cool, slightly retro look and appropriate for this man's quilt. A coordinating print from the same collection is in between the rows.


A teal polka dot is on the back, and a coordinating green fabric was used for the binding.


Some of these shirts are quite historic!


A few more details:  size is 55 x 65".  Batting is Thermore, which is really lightweight and doesn't shrink when washed.  Quilting is an overall stipple pattern, with a little straight line quilting towards the outer edge just for stablilization.

This blog space is being used for details of my custom orders. For more of my regular ramblings, show information and other fun, please join me on Instagram  and Facebook!

Tuesday, January 15, 2019

The Kimono Quilt

My first completed custom order for 2019 was a really unique project, both for the project itself and the unusual journey it had before I received it.

the finished product

My customer is retired military, and had been stationed in Okinawa. Japan, where she had bought a number of vintage kimonos.  Once she returned home (to my neighborhood!) she asked a woman who had done some upholstery work for her to make a quilt out of the kimonos. That project did not come out the way she wanted or expected, so she then contacted me to see if I could remake it into something else.  I'm sure the first quiltmaker had the best of intentions, but it was an odd piece of work:  a tied quilt pieced with dark colored upholstery fabric, with an actual acrylic blanket in between the layers.  Also included were a number of smaller projects-- a pillow, and some table runners-- that the customer hadn't asked for.

So the first step for me was a significant amount of demolition-- cutting all of the various projects apart, and then coming up with a way to get all of the various pieces onto one quilt.


note the seam matching

You'll notice from the top picture of the completed project that it's made of very large blocks, almost like panels.  That's because the previous quilter had done an extraordinary job of matching the pieces of the patterns to achieve the large blocks.


You'd never know that this block is actually 2 pieces of fabric!  This pattern matching is not something I'm able to do with any sort of competence, so I decided to take advantage of this and left the blocks as large as I could.


The peacock is also 2 matched pieces.

There's also A LOT of quilting.  I usually do an all-over pattern on clothing quilts (it works well with T-shirt quilts in particular) but this quilt really wanted to be quilted block by block, and every block is a little different.

echo quilting
outline quilting in the body, with a stipple background

I tried to let the pictures themselves tell me how to quilt each block.

Some technical details:

The fabric of the kimonos is, as far as I could tell, a very drapey polyester crepe.  It's not a fabric I've worked with before but once I stabilized it (I use Pellon 960F for all of my clothing quilts) it worked just fine for piecing and quilting.

Batting is Quilter's Dream Request, Queen size.  The finished quilt was about 85 x 100".  All of the quilting was done on my HQ Sweet 16.


On the back:  a super pretty leaf print (this one).  It's 108" wide so there's no pieceing necessary even for a big quilt like this one.  Having a one piece back saves a ton of time plus I think it bastes and quilts much easier.


I delivered the completed quilt a few days ago and the customer was absolutely ecstatic with how it turned out.  She was glad to finally get what she had originally wanted.  And this was a fun project for me, and certainly a unique one!

Please note that I am using this blog space for details about my custom orders only.  I'd be delighted if you'd join me on Facebook and Instagram for project updates, Etsy store additions, and other news.

Wednesday, May 9, 2018

Rock and Roll All Night

As promised, I am using this space to share completed custom orders.
Most of my more regular musings can now be found on Facebook and Instagram-- please join me!

Anyway, I just completed a custom T-shirt quilt out of an amazing collection of shirts:


Many of these shirts date back 30 years or more.  The oldest one with a date on it is from 1984.


Most of them are from rock concerts by iconic artists, including:  Elton John (twice!), Rod Stewart, Tina Turner, Fleetwood Mac, Counting Crows, Taj Mahal, Marshall Tucker Band, George Jones, James Taylor, the Eagles, Robert Plant (also twice), Bruce Springsteen, and Tom Petty.  There are also a few non-musical shirts from art shows, car shows and other personal events.


The biggest challenge for this project ended up being preserving the integrity of the designs (some of which are really iconic) while fitting them into the confines of a queen size quilt.  I mean, what are you going to do:  cut Tina off at the hips to achieve a standard 15" block?  I DON'T THINK SO. 


There's not a lot of additional fabric on the front of the quilt since I had a large number of t shirts to use but I did have a little room for a few fun guitar fabrics that I already had in my stash.


I love using extra wide 108" fabric for the back of a large quilt-- having a one-piece back just makes basting and quilting so much easier.  The cheerful magenta and white print is available here.  The binding is solid black fabric.


I did an all-over stipple quilting using a medium gray thread which blended nicely into both the white and black shirts (and everything in between!).  I used lightweight Quilter's Dream batting and, of course, my HQ Sweet 16 machine for the quilting.


I hope it looks as good in my customer's bedroom as it does in mine!


Tuesday, January 10, 2017

A Neutral New Year

I started the new year off with some custom quilting.

My quilting friend Jean had made a quilt top and asked me to quilt it for her.


We grabbed a picture of it before basting.
It's a symphony of neutrals!


And it's BIG.  A king sized quilt measuring 92 x 104".
I understood why she wouldn't want to take on a quilt that size on her domestic machine.


Even on the Sweet 16 managing a quilt this size is really challenging.  I kept the quilting simple with long diagonal lines that show off the geometric pattern of the blocks.

Something that doesn't show up well in the pictures is the fact that many of these fabrics are metallic--Jean never met a gold fabric she didn't like!  So even though it's all neutrals, the quilt has a gorgeous subtle shimmer to it that's really spectacular.


This is the largest quilt I've finished on the Sweet 16-- it's just a few inches larger than my Scrappy Trip-Around that I made in 2013.


Thursday, August 11, 2016

On The Wall

My longest-running UFO (Unfinished Object for you newbies out there) has finally come to a conclusion--

--of sorts


Waaaaaay back in 2010, when I first started Seriously Quilting, and blogging about it, I began an absolutely EPIC project:

Lollypop Trees Quilt 470x480
photo courtesy of Glorious Color

The awesome Lollypop Trees pattern by Kim MacLean.  It was an exciting project for me, since I was teaching myself machine applique and had yet to learn or even attempt free-motion quilting. Plus it's an absolute stunner of a quilt.  I even became a contributor to a blog devoted to Kim's designs (click here to go to the blog and see some fabulous eye candy of this quilt and some of her other designs).

But there's always SOMETHING that can be an obstacle when attempting a project like this, and of course it was TIME.  You won't be surprised to learn that this is an incredibly time consuming project.  At the time that I started it I was also a new Etsy store owner and had no idea how much time it would take to build up, and then maintain, even a modestly successful crafting business.  I quickly learned it takes a lot of time and if you want to have a successful business (even on a small scale) building that business needs to take priority.  Personal sewing definitely had to take a back seat. Plus, there was Life as well:  I was married, my son was a young teen, work, orchestra work, maintaining a rather large home, all of that.

So I made 6 blocks, loved every minute of their construction (blogged about the process here), and put them away. Always wanted to do more with them.  When I had the time.

Fast forward to maybe 2 weeks ago.  Saw the blocks hanging in the closet of my sewing room.  I had of course moved them to this new house 2 years ago with the rest of my sewing gear, but while freshly divorced their exuberant design didn't suit a season of mourning.  So they sat for a little while longer. 

Then suddenly it was time.  It didn't take long.


I knew I had a perfect spot for a wall hanging, so I purposefully left off any sashing or borders that would have made the quilt wider.


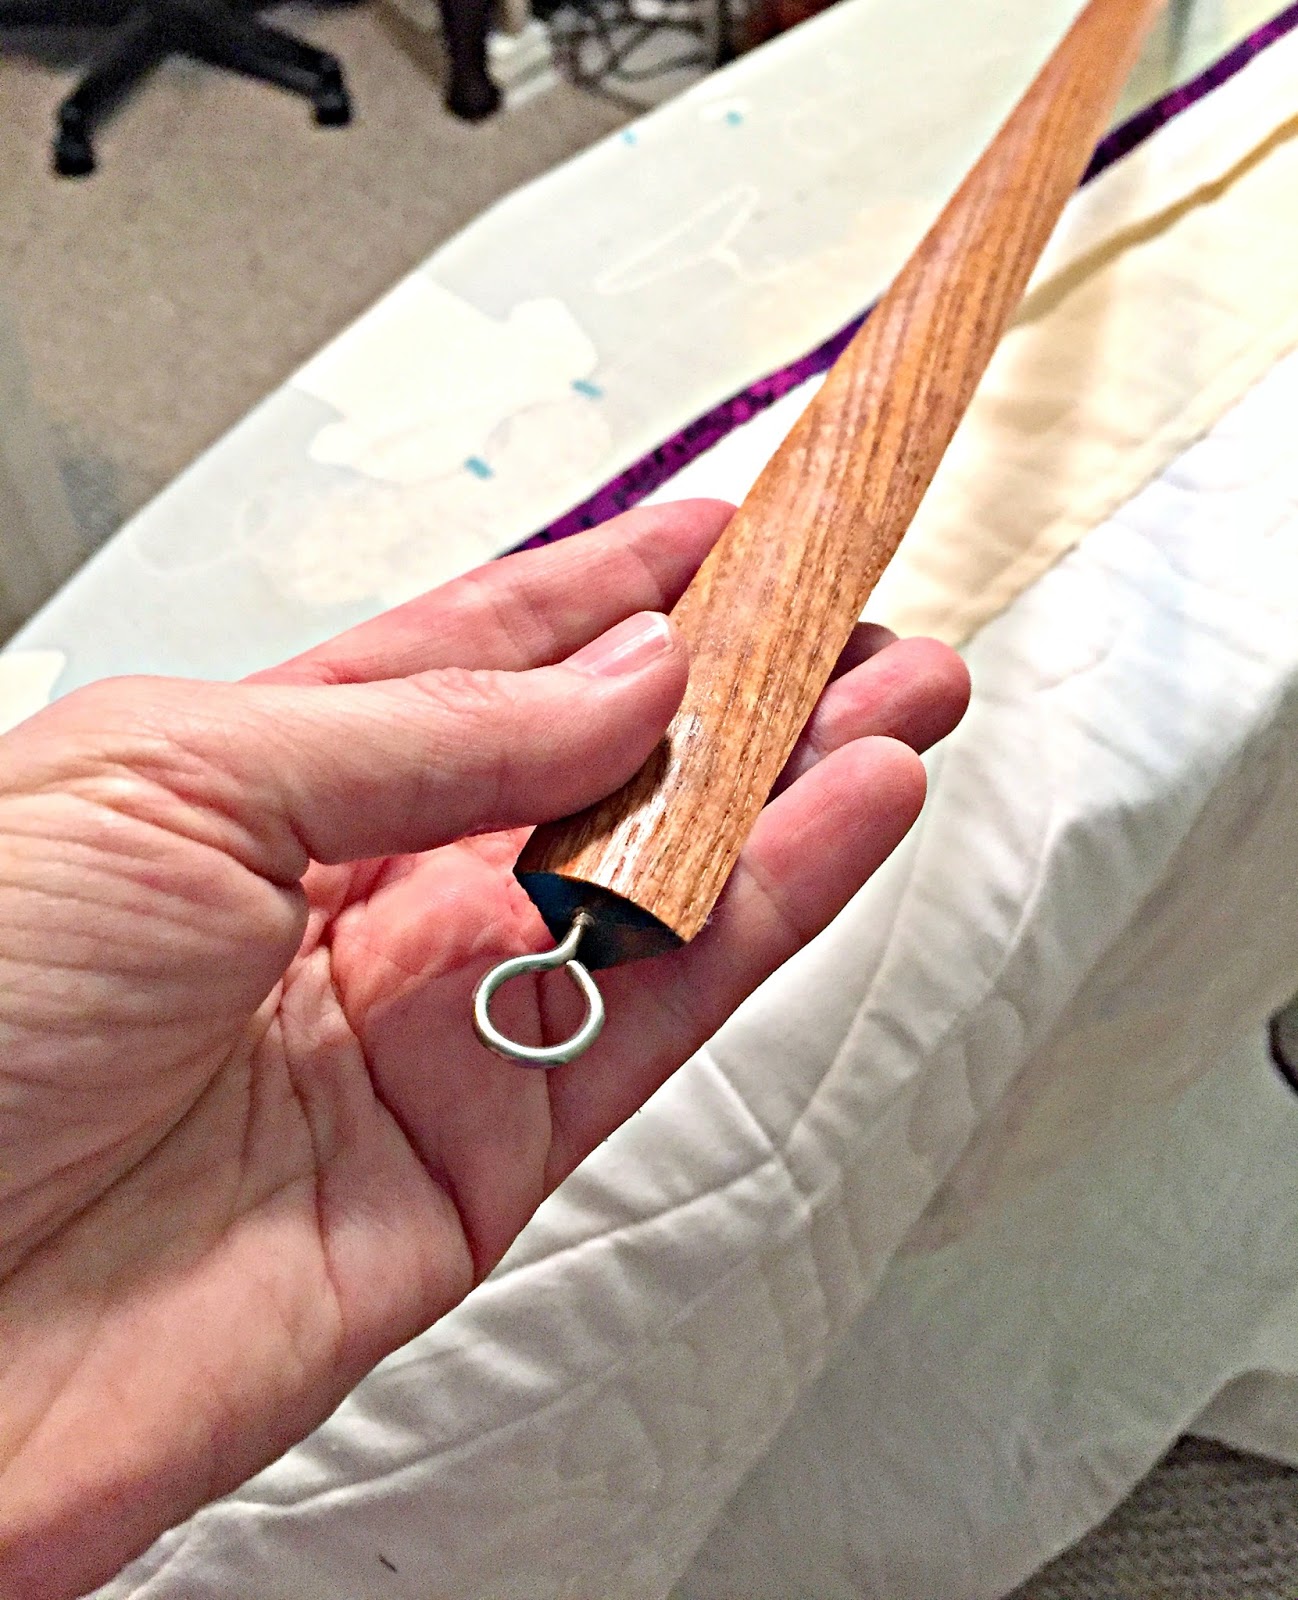
To hang the quilt I used this tutorial which I found on Pinterest. The author links the method to the one used at the San Jose Quilt and Textile Museum.  

I sewed a fabric cylinder to the back of the quilt, then used a piece of quarter round and two 
eye screws, plus 2 screws to go into the wall.   It was literally less than $2.00 of supplies.


A few quilting details:


I don't like how free motion quilting looks on top of fused applique, so I used the walking foot on my sewing machine to do some straight line quilting on top of the applique pieces.

I have since learned to "window" my applique, which eliminates stiffness and lends itself better to free motion quilting.

I've also learned how to free motion quilt, which I did around the shapes in an echo pattern.


 The quilting is easier to see from the back.

I have lots of white muslin at home so that's what I used for the backing.  And since there's no outer border that purple binding adds a nice pop of color.


Monday, March 28, 2016

Quilt Show!

Last week I had the pleasure of finally attending the Sewing and Quilt Expo in Lakeland, Florida-- about a 40 minute drive from my home.

This show has been coming to Lakeland for quite a few years but it's always been scheduled during a busy work week for me so I've never had the time to go.

This year my Spring Break occurred during the same week as the show so HURRAY!  I finally got to go!


There are loads of really fun classes offered at the Expo but when I saw this one it seemed like a wonderful opportunity to get some technical skills to use on my HQ Sweet 16.  Plus, the class was actually taught on the Sweet 16 --there was a whole classroom of them!


Here's a quick shot from the class.  We worked with handouts breaking down the basic shapes like straight lines, S curves, loops, and hooks (shown in the picture.)


Some of the students were new to the machine, others were like me and had owned them for awhile.  (I've had mine for about 3 years.)


This was a technique class, not a project class, so I just had this sampler at the end. But I learned a lot!


Some skills were brand new, like this attempt at pebble quilting.

Looks more like a bunch of grapes to me!


I LOVE THIS.  It's feathers done as "l's" and "e's".  Make your spine, then work your way down with the l's and e's done as figure 8's.  Really easy and I love the modern look.


This fern design was one of my favorites too, working all with "S" shapes.  And I like how it looks really good if the 2 sides of leaves don't match.


As usual at an event like this there were lots of vendors plus some beautiful quilts on display.

I loved this one from the Tampa Modern Quilt Guild.  That's some really adventurous quilting in the white spaces.


Now THAT'S what pebble quilting is supposed to look like!

Saturday, April 18, 2015

Basting, and meditation

My friend Christine brought over a new quilt top for me to complete.

You'll recall that she likes constructing quilt tops but doesn't enjoy the actual quilting process.  And her experiences with commercial long arm quilters has been somewhat less than satisfactory.

I think she likes how I finish her quilts because they still look homemade at the end of the quilting process, since I quilt them either on my sewing machine (for straight line designs) or on the Sweet 16 (for free-motion designs).

She brought a twin-size scrap quilt that she made for her husband:

ready for basting


That black and white design in the middle really makes it interesting.


I think I definitely want to quilt it so that black and white portion "pops" but HOW that is going to happen is still up in the air.  Further meditation (and maybe some inspiration on Pinterest) is needed.

Wednesday, November 5, 2014

Ellen's Quilt

My quilt guild friend Ellen recently asked me to finish a quilt for her.

She recently retired, and has swung into high gear as far as Getting Things Done is concerned. She's on a mission to finish up projects from the Old Life, and clear the decks for a New Life.

(I can totally relate!)

This quilt top was on her list of things she wanted completed.  I was happy to help out!


This quilt was a pattern-free project that she made up as she went along.

Dimensions:  about 45 x 65"


It's an improvisational project, so I felt comfortable with an equally improvisational quilting style.

It's quilted it in sections.

The larger sections have swirls.


There are also flowers in the 9 patch blocks, plus some straight line quilting throughout the quilt that unites all of the smaller sections of free motion quilting.


Ellen has an enviable capacity for precision pieceing of tiny fabric pieces.  As you can see from the picture at left, many of the squares are less than 1" finished.


This was a really fun project for me,
mostly because the quilt is in a completely
different style than what I usually do.  It's always fun to stretch my boundaries!


Monday, August 12, 2013

Quilting Today

I finished quilting my new Christmas quilt today!


I went with this wavy grid pattern from the Free
Loose Weave is fun to quilt because all it involves is long, slightly curving lines stitched horizontally and vertically across your quilting space. Learn to sew this free motion design at http://freemotionquilting.blogspot.com/2010/11/day-229-loose-weave.htmlMotion Quilting Project (here) and I'm really pleased
with how it looks!


I did the quilting free motion on my Sweet 16 machine, but I see no reason why it couldn't be done with a walking foot on a regular sewing machine.


Here's a reminder of what the whole quilt looks like. I think a bright red and white stripe would be the perfect binding for this!